What Are the Most Affordable Filament Storage Solutions That Still Work?
1. You Don’t Need to Spend Big to Store Smart
Let’s face it: filament storage doesn’t sound exciting.
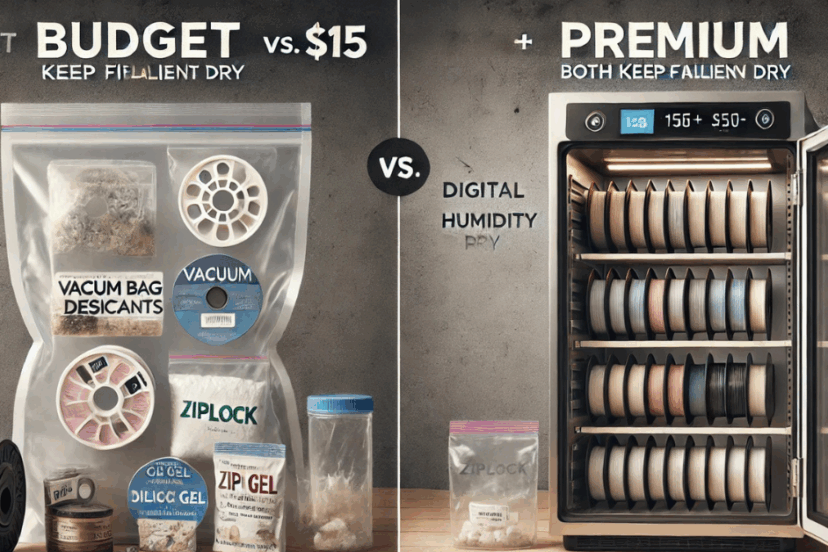
And with high-end dry boxes going for \$80–\$200, it’s tempting to skip it entirely.
But if you’ve ever wasted a print on wet filament, you know storage matters.
The good news? You can keep filament safe, dry, and organized—even on a tight budget.
2. Why Filament Storage Even Matters on a Budget
Cheap filament isn’t cheap when it gets ruined by humidity.
- Popping sounds
- Poor layer adhesion
- Brittle prints
- Nozzle clogs
- Complete print failures
Even PLA isn’t immune. That’s why budget storage is better than no storage.
3. What You Really Need in Any Storage Setup
There are 3 essentials—no matter the cost:
✅ Airtight or sealed container
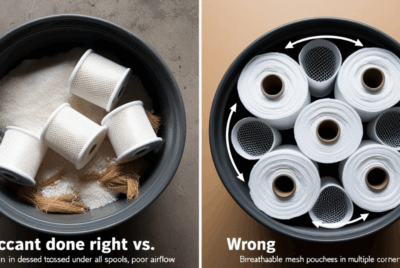
✅ Moisture absorber (silica gel)
✅ A way to monitor humidity (even a card)
Everything else—like heating elements or Bluetooth—is optional.
4. Solution #1: Vacuum Bags with Silica Gel
- 💸 Cost: ~\$10–\$15 for a 5–6 bag kit
- 🌀 Best For: Long-term storage of multiple spools
- 🛠️ What You Need:
- Vacuum seal bags (eSun, Dry & Dry, etc.)
- Hand pump (usually included)
- Color-changing silica gel
- Humidity cards (optional)
Why it works: Fully sealed, air removed = no moisture entry.
Pro tip: Store upright in a plastic crate to save space.
5. Solution #2: Food Storage Bins
- 💸 Cost: \$5–\$20
- 🌀 Best For: Short-term storage or active spools
- 🛠️ What You Need:
- Airtight cereal/pantry/pet food bins
- Desiccant pack inside
- Optional: humidity card
Why it works: Sealed bins block ambient moisture.
Bonus: They’re stackable and easy to label.
6. Solution #3: Stackable Airtight Boxes
- 💸 Cost: \$10–\$25
- 🌀 Best For: Modular small-space storage
- 🛠️ What You Need:
- Gasket-sealed boxes (IRIS, Sterilite, etc.)
- One bin = 2–5 spools
- Toss in silica gel and RH card
Why it works: Durable, reusable, and space-saving.
Great for under desks or inside shelves.
7. Solution #4: Upcycled Containers and DIY Mods
- 💸 Cost: Free–\$10
- 🌀 Best For: Makers who like to tinker
- 🛠️ What You Can Reuse:
- Coffee tins with lids
- Cat litter buckets (cleaned!)
- Breadboxes or storage crates
- Cardboard boxes with liner and seal
Seal with weatherstrip, silicone, or duct tape.
Pro tip: Add a feed port for direct dry-box printing.
8. Solution #5: Large Ziplock Bags + Desiccant
- 💸 Cost: \$3–\$7
- 🌀 Best For: Temporary protection or backup storage
- 🛠️ Use:
- Heavy-duty 2-gallon freezer bags
- Silica gel
- RH card (tuck into label)
Why it works: Keeps moisture out for a few weeks—great while waiting to dry or use filament.
Not great for long-term storage or stackability.
9. Solution #6: Dry Cabinet Alternatives
- 💸 Cost: ~\$40 (DIY)
- 🌀 Best For: Makers with lots of spools
- 🛠️ Build it with:
- Clear plastic storage cabinet
- Add rechargeable dehumidifier
- Line drawers with foam
- Add labels + silica pouches
Why it works: Dry cabinet function—without the \$200+ price tag.
10. Add-On Essentials That Don’t Break the Bank
| Tool | Purpose | Price |
|---|---|---|
| Color-changing silica gel | Moisture absorption | \$6–\$10 |
| Humidity cards | Moisture check | \$5–\$8 for 10-pack |
| Mini hygrometers | RH tracking | \$8–\$15 |
| Label stickers or tape | Tracking dry dates | \$2–\$5 |
| Drawer dividers | Organization | \$5–\$10 |
Little tools = big impact.
11. How to Know When to Spend (and When to Save)
💰 Spend a little more on:
- Desiccants that can be recharged
- Hygrometers if you store lots of filament
- Quality bins that won’t crack or warp
💸 Save on:
- Brand names (store-brand bins often work fine)
- Upcycling instead of tossing old containers
- Drying—use your oven or food dehydrator
12. Mistakes Budget-Conscious Makers Should Avoid
❌ Skipping silica entirely
❌ Using open or vented containers
❌ Ignoring RH levels
❌ Forgetting to label dry/opened dates
❌ Letting spools sit out between prints “just for a day”
Protect your spools like you would protect your tools.
13. Best Cheap Products (Real Brands That Work)
| Product | Use | Price |
|---|---|---|
| eSun Vacuum Bag Kit | Vacuum storage | ~\$15 |
| IRIS USA Weathertight Box | Stackable bin | ~\$18 |
| Govee Mini Hygrometer | Smart humidity tracking | ~\$12 |
| Dry & Dry Silica Pack (50g) | Reusable desiccant | ~\$9 |
| Oxo Good Grips Cereal Bin | Active spool bin | ~\$16 |
All widely available on Amazon, Walmart, or Target.
14. Organizing Multiple Spools on a Budget
🌀 Tips:
- Use milk crates for vertical stacking
- Label each spool with dry date and material
- Store overflow in vacuum bags in a tote
- Keep actives in a food bin near your printer
- Group by material or usage frequency
You can run a tight ship without a fancy setup.
15. Final Thoughts: Small Budget, Big Protection
Filament storage doesn’t have to be expensive.
It just has to be smart.
Whether you’ve got \$5 or \$50 to spare, you can:
✅ Keep your spools dry
✅ Protect your print quality
✅ Organize your materials
✅ Avoid costly reprints and waste
Your wallet may be tight—but your filament protection doesn’t have to be.
❓FAQs
- What’s the cheapest way to store filament safely?
Vacuum seal bags with silica gel—under \$15 for multiple spools. - Can I use cardboard boxes for filament?
Only if you seal the inside with a liner and use silica packs—but not ideal long term. - How long will silica gel last in budget containers?
Usually 2–4 weeks before needing recharge, depending on RH exposure. - What’s better: vacuum bags or food bins?
Vacuum bags for long-term storage, food bins for daily access. - Is it okay to store filament near my 3D printer?
Yes, as long as it’s sealed and away from heat vents or open windows.