Revolutionize Your Prints: Mastering the Art of 3D Printer Bed Cleaning

Have you ever noticed how a speck of dust can ruin an entire 3D print? That’s right, folks! The secret to a flawless print isn’t just in the printer itself—it’s in the cleanliness of the printer bed. So, let’s dive into the art of 3D printer bed cleaning!
Understanding the Basics
What is a 3D Printer Bed?
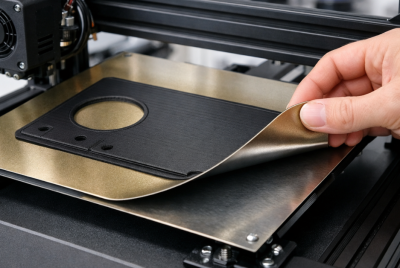
The 3D printer bed, often referred to as the build platform, is the stage of your 3D printer where all the magic happens. It’s the surface upon which your printer constructs your designs, layer by layer. The bed needs to be perfectly leveled and maintained at the right temperature to ensure optimal adhesion and quality of the prints. Typically made from materials like glass, aluminum, or PEI, each bed type offers unique benefits and challenges in terms of heat distribution, adhesion, and ease of print removal. A well-maintained bed leads to consistent, high-quality prints, as it’s the first point of contact between your machine and the material. Think of it as the canvas for your 3D masterpieces – the smoother and cleaner it is, the better your artwork will turn out!
👉 Want better adhesion and fewer failed prints right from the start?
Start with the right tools and setup here:
👉 View Recommended 3D Printing Gear
Why Does the Bed Get Dirty?

A 3D printer bed gets dirty due to a variety of factors that can impact the quality and adhesion of your prints. Firstly, as the printer operates, filament materials like ABS, PLA, or PETG melt and extrude onto the bed. Tiny wisps and strings from these materials can accumulate over time, creating a layer of residue. Secondly, the very act of printing involves high temperatures and pressure, which can cause not just filament residues but also dust and particulate matter to stick more stubbornly to the bed.
External factors also contribute to a dirty bed. Dust and oils from your hands when you handle the bed can leave behind residues. Even the environment where the printer is located can affect cleanliness; for instance, a dusty room or one with a lot of air movement might deposit more particles onto the bed’s surface.
Moreover, the adhesive substances used to improve print adhesion — such as glue sticks, hairspray, or specialized adhesive sheets — can leave residues that build up over time. Each print layer might leave behind a slight trace, and these layers can accumulate, affecting the bed’s level and the print’s base quality.
In essence, the combination of material residues, environmental factors, and adhesive applications make the bed a magnet for dirt and grime, necessitating regular cleaning to maintain the printer’s performance and output quality.
Signs of a Dirty Bed
Recognizing the signs of a dirty 3D printer bed is crucial for timely maintenance to ensure consistent, high-quality prints. Here are some clear indicators:
- Poor Adhesion: One of the first signs of a dirty bed is the print not sticking properly. If your prints are warping, curling, or lifting at the edges, it might be due to residue or oils on the bed disrupting the adhesion.
- Uneven Prints: If you notice that your prints have started to look uneven, with certain areas higher or lower than others, or they have irregularities on the first layer, it could be due to debris or residue creating an uneven surface on the bed.
- Visible Grime or Residue: Sometimes the signs are visual. Look for any spots, streaks, or filament pieces left behind from previous prints. Over time, the bed might develop a cloudy, discolored, or shiny appearance, indicating it’s covered in residue.
- Frequent Print Failures: If prints fail more often than usual, especially at the first layer, it could be due to a build-up on the bed. A clean bed is crucial for the initial layers of your print; any dirt can disrupt the delicate balance needed for a successful print.
- Reduced Print Quality: Even if the print completes, a dirty bed might result in lower quality, with issues like rough bottoms, poor detail, or blemishes. These defects often trace back to initial layers not forming correctly due to a dirty bed.
It’s important to regularly inspect your printer bed, not only for visible signs of dirt but also for any subtle changes in print quality or adhesion that might suggest it’s time for a clean. Keeping an eye out for these signs and promptly addressing them ensures your 3D printer continues to produce stellar, high-quality prints.
Preparing to Clean
Tools and Materials Needed
Properly cleaning your 3D printer bed requires a set of tools and materials designed to effectively remove residue without damaging the bed. Here’s what you’ll typically need:
- Isopropyl Alcohol (IPA): A staple for cleaning, 70% or higher IPA is excellent for removing grease and residues. It evaporates quickly, leaving a clean, residue-free surface.
- Scraper or Putty Knife: A flat scraper or putty knife is useful for gently removing stuck-on filament and other debris. Ensure it’s made from a material that won’t scratch or damage the bed.
- Microfiber Cloths: These cloths are great for cleaning and polishing the bed. They don’t leave lint behind and can be used with IPA or water to wipe down the surface.
- Soap and Water: Sometimes, a simple solution of soap and water is enough for general cleaning, especially for removing dust or for beds with adhesive residue.
- Acetone (for certain bed types): Acetone can be effective for deep cleaning or for removing certain types of materials, but it should be used sparingly and only with compatible bed materials, as it can damage some surfaces.
- PEI Bed Cleaner (if applicable): If you’re using a PEI print bed, a specialized cleaner can help maintain its quality and longevity.
- Disposable Gloves: Wearing gloves can prevent oil from your hands from transferring to the clean bed and can also protect your hands from chemicals used in cleaning.
- Abrasive Pads/Sponges: These are useful for tough residues but must be used carefully to avoid scratching the bed surface. Always opt for non-abrasive or bed-specific pads.
- Plastic Razor Blades: For delicate surfaces that easily scratch, plastic razor blades can remove materials without the risk of damage.
- Compressed Air: A can of compressed air or an air blower can remove dust and small particles from the bed before and after the cleaning process.
Gathering these tools and materials before you start the cleaning process ensures you’ll be prepared for whatever type of dirt or residue you encounter on your 3D printer bed. Remember to always check your printer’s manual or manufacturer’s recommendations as some materials and chemicals may not be suitable for all bed types.
👉 Cleaning your print bed doesn’t have to be a struggle.
Having the right tools makes it easier, safer, and more effective:
👉 Check current price on Amazon: 3D Printing Tool Kit
Cleaning Techniques
Step-by-Step Guide

Cleaning your 3D printer bed is a detailed process that, when done regularly and carefully, can significantly improve the quality of your prints. Here’s a step-by-step guide to effectively cleaning your 3D printer bed:
- Power Off and Cool Down:
Ensure your printer is turned off and unplugged.
Allow the bed to cool completely if it was recently used. - Remove Loose Debris:
Gently use a scraper or putty knife to remove any large, loose pieces of filament or debris.
Use compressed air to blow away any loose particles. - Initial Wipe Down:
Wipe the surface with a dry microfiber cloth to remove dust and small particles. - Apply Cleaning Solution:
For general cleaning, moisten a microfiber cloth with isopropyl alcohol (IPA) and gently wipe the surface. For tougher residues, you might need a soap and water solution or acetone for certain bed types. Always check the compatibility of your cleaning solution with your bed material. - Scrub Gently:
Use non-abrasive pads or sponges to address any stubborn spots or stains. Scrub gently in a circular motion, applying minimal pressure to avoid scratching or damaging the bed. - Wipe and Dry:
After scrubbing, wipe the bed with a clean, damp cloth to remove any remaining cleaner or residue. Follow up with a dry microfiber cloth to ensure the bed is completely dry and free of streaks. - Inspect the Bed:
Look over the bed to ensure all residue and stains are gone. Pay special attention to any signs of damage or areas that might need re-cleaning. - Level the Bed:
Once the bed is clean and dry, it’s a good time to ensure it’s properly leveled. Follow your printer’s instructions for bed leveling. - Final Touches:
Optionally, if you use an adhesive aid like glue stick or hairspray, apply a thin, even layer to the bed to enhance adhesion for the next print. - Regular Maintenance:
After cleaning, make a habit of wiping down the bed with IPA after each print to minimize build-up and extend the time between deep cleanings.
By following these steps, you can maintain a clean and efficient 3D printer bed, ensuring the best possible foundation for all your prints. Regular maintenance not only prolongs the life of your printer but also significantly improves the quality and reliability of your 3D printing projects.
Maintenance Tips

How to Keep the Bed Clean Longer
Keeping your 3D printer bed clean over time requires consistent maintenance and some preventative measures. Here are tips to help extend the cleanliness and life of your printer bed:
- Regular Wiping:
After each print, allow the bed to cool and then wipe it down with a microfiber cloth dampened with isopropyl alcohol. This will remove any immediate residue and prevent build-up. - Use Proper Adhesives:
Apply adhesives like glue stick or hairspray sparingly and evenly. Over-application can lead to excess residue and more frequent cleaning. Consider using adhesives that are easier to clean or specifically designed for 3D printing. - Handle with Care:
Always handle the bed with clean hands or wear gloves to prevent transferring oils and dirt. Avoid touching the bed surface unnecessarily. - Protect the Bed:
When not in use, cover the bed to protect it from dust and debris. This could be as simple as placing a clean, dry cloth over it. - Regular Inspections:
Regularly check for and remove any bits of filament, dust, or debris before they can be baked onto the bed in subsequent prints. - Choose the Right Filament:
Some filaments are messier than others. Using high-quality filament can reduce the residue left behind. - Temperature Management:
Use the correct bed temperature for the material you’re printing with. Excessive heat can cause more residue to stick to the bed. - Upgrade Bed Surface:
Consider using a build surface that is easier to clean or maintain, like a removable, flexible build plate or specialty surfaces designed for easy cleaning. - Use PPE Where Appropriate:
Use a spatula or scraper with a handle to remove finished prints, reducing the need to touch the bed and preventing accidental scratches or gouges. - Keep Tools Clean:
Ensure that any tools you use on the bed, like scrapers or brushes, are clean and free of debris that could transfer back onto the bed. - Timely Replacement:
Recognize when the bed surface is beyond cleaning or repair and replace it promptly to maintain print quality.
By incorporating these practices into your regular 3D printing routine, you can significantly extend the time between deep cleans and maintain a more consistent print quality. Regular attention and care not only preserve the bed but also contribute to the overall longevity and performance of your 3D printer.
Common Mistakes

What to Avoid
When cleaning and maintaining your 3D printer bed, there are several common mistakes that can lead to further issues or damage. Being aware of these can save you time, preserve your equipment, and ensure the best possible prints. Here are some common pitfalls to avoid:
- Using Abrasive Materials:
Avoid using metal scrapers, steel wool, or abrasive pads on your bed, especially if it has a delicate surface like PEI or glass. These can create scratches where filament residues can accumulate and ruin the smoothness needed for good adhesion. - Excessive Force:
When removing prints or cleaning, applying too much force can crack or damage the bed. Always use gentle, even pressure, especially with glass beds. - Improper Chemicals:
Using the wrong type of cleaning agents, like acetone on a bed not resistant to it, can cause cloudiness, cracking, or even complete breakdown of the bed material. Always confirm the compatibility of cleaning solutions with your specific bed material. - Ignoring Temperature:
Cleaning the bed while it’s too hot or too cold can affect cleaning effectiveness and safety. Always allow the bed to cool down (but not completely cold for certain adhesives) for optimal cleaning conditions. - Overlooking Residue from Adhesives:
If you use glue stick, hairspray, or other adhesives, failing to completely remove them during cleaning can lead to a buildup that affects print quality. Ensure all adhesive residue is thoroughly cleaned off. - Touching the Bed Unnecessarily:
Every touch can leave oils and dirt. Handle the bed as little as possible and always with clean hands or gloves. - Not Leveling After Cleaning:
Cleaning can sometimes alter the bed’s level, especially if you’ve applied significant pressure or made adjustments. Always re-level the bed after a thorough cleaning. - Skipping Regular Inspections:
Failing to regularly check and maintain the bed can lead to compounded problems. Make bed inspection and cleaning a part of your routine. - Letting Filament Sit:
Leaving filament residues or failed prints on the bed for too long can make them harder to remove and potentially stain or damage the bed. - Inconsistent Cleaning:
Sporadic cleaning habits can lead to unpredictable print quality. Establish and adhere to a regular cleaning schedule.
Avoiding these common mistakes can significantly improve your maintenance routine’s effectiveness and the longevity of your 3D printer bed. Remember, a well-maintained bed is key to high-quality, consistent 3D printing results.
Advanced Tips

Professional Advice for Optimal Results
Once you’ve mastered the basic maintenance of your 3D printer bed, you can employ advanced techniques and insights to further enhance the longevity and performance of your bed. Here are some expert tips for those looking to go the extra mile:
- Fine-Tuning Temperature Settings:
Experiment with different bed temperatures for various materials. Even slight adjustments can significantly affect adhesion and ease of removal, reducing the need for frequent cleaning. - Invest in Quality Build Surfaces:
Consider upgrading to a high-quality build surface that suits your most commonly used materials. Options like PEI, glass, or magnetic build plates offer different advantages and may reduce maintenance needs. - Custom Adhesives:
Develop a blend of adhesives tailored to your specific printing needs. Some users mix hairspray with a glue stick for a unique balance of tackiness and ease of cleaning. - Environmental Controls:
Maintain a stable printing environment with controlled temperature and minimal dust. Enclosures can help regulate temperature and reduce particulate interference. - Regular Calibration:
Beyond leveling, ensure your printer’s entire extrusion system is well-calibrated. This includes checking for consistent extrusion rates and nozzle height, which can affect how the filament lays down on the bed and how clean it stays. - Use of Specialty Tools:
Employ precision tools like dial indicators or feeler gauges for bed leveling to achieve a highly consistent and accurate print surface. - Advanced Cleaning Solutions:
Explore specialty cleaning agents or methods like ultrasonic cleaners for removable beds, especially useful if you’re frequently switching between different types of filament. - Preventive Coatings:
Some users apply a thin layer of protective coating that makes cleaning easier and extends the life of the bed. These are often specific to the type of bed you are using. - Learning Material-Specific Maintenance:
Different materials can often require different maintenance strategies. Compile a set of best practices for each type of filament you use regularly. - Record Keeping:
Keep a maintenance log with notes on what works best for your setup. Track when and how you clean, any issues you encounter, and the solutions that worked. This personalized record can be a goldmine for troubleshooting and optimizing your process.
These advanced tips are for those looking to refine their 3D printing process further. While they require additional effort and sometimes investment, the payoff in print quality and the efficiency of your printer can be substantial. As with any advanced technique, it’s essential to consider the specifics of your equipment and needs, and proceed with caution to avoid damage or unnecessary wear.
👉 Ready to improve adhesion and get cleaner, more consistent prints?
The right tools can help you reduce failures and maintain your printer more easily.
👉 Explore the exact tools and gear we recommend here:
👉 View Recommended 3D Printing Gear
Conclusion

Cleaning your 3D printer bed might seem tedious, but it’s a game-changer for your prints. Keep it clean, and your printer will thank you with stunning results!
FAQs
- How often should I clean my 3D printer bed?
The frequency of cleaning depends on how often you use your printer and the types of materials you print with. As a general rule, a quick wipe with isopropyl alcohol after each print and a thorough cleaning every 10-20 prints works well for most users. However, if you notice any issues with adhesion or print quality, it might be time for a clean. - Can I use any household cleaner for my bed?
It’s best to stick to cleaners recommended by your bed’s manufacturer or those known to be safe for 3D printer beds, such as isopropyl alcohol or specific 3D printer bed cleaners. Avoid using household glass cleaners or abrasive detergents, as they might damage the bed’s surface or leave residues that affect print quality. - What’s the best way to remove stubborn residues?
For stubborn residues, gently use a plastic scraper or putty knife to lift the material without scratching the bed. If residue remains, apply a small amount of acetone (for compatible bed materials) or a specialized adhesive remover, and gently wipe away. Always follow with a clean wipe of isopropyl alcohol to remove any cleaning agent residues. - How do I know if my bed is level after cleaning?
After cleaning, perform a bed leveling procedure according to your printer’s instructions. A common method involves moving the nozzle close to the bed at several points and adjusting until a piece of paper lightly drags between the nozzle and bed. Consistent, successful first layers in prints are also a good sign that your bed is level. - Are there any signs that I’m over-cleaning my bed?
Over-cleaning can lead to premature wear or damage. Signs include a cloudy or scratched bed surface, a decrease in adhesion due to removed coatings, or loosening of the bed’s mechanical parts from frequent handling. If the bed doesn’t show residue and prints are adhering well, it might not need cleaning as often.

Comments are closed.