How does labeling help with troubleshooting filament-related print issues?
1. Introduction: The Clues Are in the Label
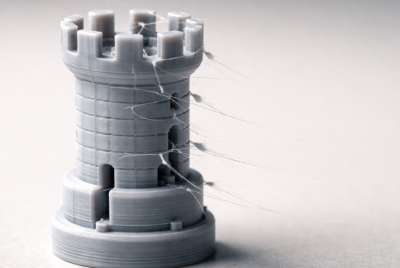
Your print failed.
You change the nozzle, re-slice the file, check the bed…
but forget to check the spool label—or maybe there isn’t one.
Don’t underestimate how labeling your filament can help you troubleshoot issues faster and smarter.
2. Why Filament-Related Print Issues Happen
Not every failed print is your slicer’s fault.
Common filament issues include:
- Moisture absorption
- Incorrect material identification
- Old or brittle filament
- Brand-specific quirks
- Wrong extrusion settings
Good labeling gives you a trail of evidence to follow.
3. How Labeling Prevents Common Print Mistakes
Without clear labels, you might:
❌ Print PETG on PLA settings
❌ Forget when filament was last dried
❌ Use expired or brittle filament
❌ Repeat failed prints without knowing the real cause
❌ Blame your printer when it’s actually your spool
Labels act like your filament’s memory.
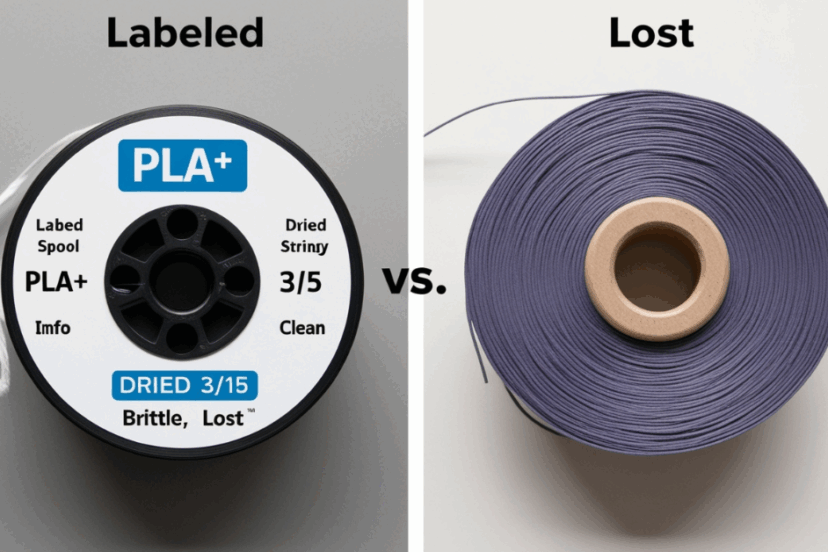
4. Key Details Labels Should Include
To troubleshoot faster, make sure your labels include:
- Material type + brand (e.g., PLA+, eSUN)
- Color name or code
- Date dried
- Storage conditions (e.g., “RH < 25%”)
- Slicer profile used (optional but helpful)
- Notes (e.g., “Under-extruded at 200°C”)
Even one extra line of info can point you in the right direction.
5. Moisture Troubleshooting Starts with the Last Dry Date
Your first question should be:
“When was this filament last dried?”
If the label says “dried 6 weeks ago” and RH is 45% in the bin, you’ve found the issue: moisture.
A “Dried On” label turns a mystery into a fixable step.
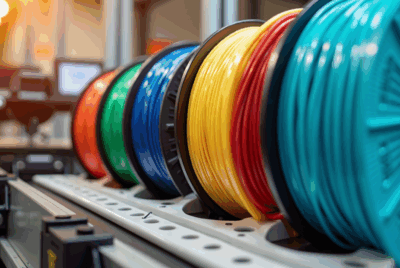
6. Material Confusion: Avoiding “What Spool Was This?”
PLA, PETG, ABS… they look similar on the spool.
But using the wrong material settings can cause:
❌ Stringing
❌ Warping
❌ Delamination
❌ Under- or over-extrusion
Clearly labeled spools avoid time-wasting reprints and setting guesswork.
7. Diagnosing Print Failures by Color or Brand
Some colors or brands require different:
- Flow rates
- Retraction settings
- Bed temperatures
- Speeds
Labeling helps you isolate performance quirks based on filament type or supplier.
You might discover:
“All failed orange prints were from Brand X—maybe I need to tweak temps.”
8. Tracking Spool Age and Performance Over Time
Old filament = increased risk of:
- Brittleness
- Color shift
- Moisture saturation
- Inconsistent diameter
Labeling the purchase date or first use date helps track:
✅ Filament lifespan
✅ Storage impact
✅ When to retire a spool
9. Monitoring Desiccant and Humidity Status
If your bin contains multiple spools and only one is failing, check:
- Was that spool stored with fresh desiccant?
- Is its RH status noted on the label?
- Was it dried recently?
Well-labeled spools + humidity tracking = fewer surprises and faster fixes.
10. When Labeling Saves You from Unnecessary Reprints
You print the same model 3 times. It fails every time.
Turns out—it was the same misidentified spool each time.
A label could’ve saved:
❌ Hours of troubleshooting
❌ Wasted filament
❌ Printer wear
Never underestimate “PLA, dried 3/10, re-dry by 4/7” as a lifesaver.
11. Spotting Inconsistencies Between Different Spools
Labeling also helps identify subtle issues like:
- One brand’s PETG needing 10°C more heat
- A specific color requiring lower fan speeds
- Different roll weights needing tension tweaks
Labels help you build a performance history per spool.
12. Labeling for Multi-Machine and Shared Workspaces
In shared environments:
✅ Labels prevent mix-ups
✅ Show which machine used what
✅ Reduce conflicts or confusion
✅ Make accountability easier
Color-code spools or bins by printer or user if needed.
13. Labeling and Slicer Settings Alignment
Spools labeled with their:
- Recommended temp
- Nozzle size used
- Slicer profile
…make it easy to recreate past successful prints—especially when revisiting projects after weeks or months.
Think of it as building your own filament knowledge base.
14. Using Labels to Track “Problem Filaments”
Not all spools are created equal.
If one gives you trouble:
- Flag it with a red sticker
- Add a warning: “Inconsistent extrusion” or “Use only for draft prints”
- Keep a bin just for problematic or experimental materials
That way, you know what to expect before it hits the nozzle.
15. Final Thoughts: Labels Are the Print Logs of Your Filament
Your filament is the raw material of your creativity.
If it’s unlabeled, untracked, or forgotten—so are the lessons you’ve learned using it.
✅ Label everything
✅ Track the small things
✅ Build your own filament audit trail
Because the next time a print fails…
your label might be the quickest fix you never knew you had.
❓FAQs
- What’s the most important thing to put on a filament label?
The material type and dry date. Everything else helps, but those are crucial for troubleshooting. - Should I label spools that are still factory sealed?
Yes—add purchase date, brand, and intended use. It helps you manage your inventory more efficiently. - How do I mark “problematic” filament?
Use colored tape or a red label with notes like “test only,” “print at 235°C,” or “inconsistent flow.” - What if I’m using a community printer lab?
Always label your filament with your initials, material type, and machine compatibility. - Can I skip labeling if I only have a few spools?
Even then—labeling saves time. It helps with drying cycles, RH monitoring, and reusing leftovers wisely.