Comprehensive Guide to Cleaning and Post-Processing 3D Resin Prints
Have you ever marveled at the intricate details of a miniature model or the perfect precision of a custom jewelry piece? These masterpieces often start their journey as mere designs in a 3D resin printer, where the magic of turning liquid into solid takes place. But what happens after the print job is done? Is the process as simple as it sounds, or is there more to it?
3D resin printing is like capturing a moment in time, transforming liquid resin into a frozen sculpture with the help of light and technology. However, just like a sculptor must smooth and refine their work, so must we with our 3D prints. The post-processing stage, particularly washing the prints, is crucial—it’s where the beauty of the final product is either revealed or remains hidden beneath layers of uncured resin.
Why is this step so vital? Imagine painting on a dirty canvas, where every speck of dust or unwanted texture can distort your vision. Similarly, uncured resin on a 3D print can obscure details and affect the structural integrity of the object. Cleaning is not just a chore; it’s an essential part of bringing your artistic vision to life, ensuring that each print not only looks spectacular but is also safe to handle and use.
In this guide, we’ll dive into the why and how of washing 3D resin prints, equipping you with the knowledge to ensure your prints come out as perfect as your original design envisioned. Ready to turn your next project into a masterpiece? Let’s get started!
Understanding Resin
When diving into the world of 3D resin printing, think of resin much like the ink in your traditional printer—except it’s not just used to mark paper, but to create three-dimensional masterpieces. But what exactly is this material that transforms from a gooey substance into a solid object?
Why does resin need special attention? Resin, in its uncured state, is sticky and sensitive, akin to a raw egg that needs to be cooked to perfection. Just as you wouldn’t want runny eggs ruining your breakfast plate, you wouldn’t want uncured resin spoiling the crisp, detailed finish of your 3D print. Cleaning resin off your prints isn’t just about aesthetics; it’s about preserving the intricate details that make your creation unique.
What types of resin are there? Imagine walking into a candy store—there are countless varieties to choose from, each with its own flavor and appeal. Similarly, resins come in various formulations, each designed for different applications. There’s the standard resin, which could be likened to your everyday milk chocolate—versatile and popular. Then there are tougher versions, sort of like the dark chocolate of resins, known for their durability. And let’s not forget the water-washable resins, the sugar-free gum of the bunch, offering easier clean-up.
Each type of resin has its own ‘personality’ and requires a tailored approach when it comes to cleaning. Understanding these nuances is the key to not just using the resin, but mastering it. Why? Because like a chef knows their ingredients, a skilled 3D printer knows their resin.
Types of Resin:
- Standard Resins: These are the most common and are used for general purposes. They cure quickly and offer a good balance of strength and flexibility. Standard resins are ideal for models, art projects, and functional parts that don’t require extreme durability.
- Tough Resins: Designed to simulate the strength and stiffness of ABS plastic, tough resins are used for parts that will undergo higher stress or strain. They are more resistant to impact and wear but can be more challenging to clean due to their toughness.
- Flexible Resins: These resins produce parts that can bend and stretch with a lower risk of breaking. They are perfect for objects that require flexibility, like gaskets or hinges. Cleaning flexible resins promptly is crucial as any uncured resin left on the model can compromise its flexibility.
- Water-Washable Resins: A newer category, these resins can be cleaned with water instead of chemicals like isopropyl alcohol, reducing exposure to toxic fumes. However, thorough rinsing under running water is necessary to remove all residues effectively.
Why Cleaning is Crucial:
- Quality of the Final Print: Uncured resin can stick to the surface and crevices of the print, hardening in unwanted areas, which can affect the smoothness and detail of the model. Proper cleaning ensures that the final product is as close as possible to the intended design.
- Safety of the Print: Residual uncured resin can continue to react if not cleaned properly, potentially causing warping or deformation of the model over time. This is especially critical for functional parts in mechanical assemblies.
- Health and Safety: Uncured resin is toxic, and improper handling can pose health risks. Ensuring all residual resin is removed and properly disposing of the cleaning solvents are essential steps to protect both the user and the environment.
Effective cleaning of resin prints starts with understanding the specific needs of the resin used, ensuring that each print achieves the desired quality and durability while maintaining safety standards.
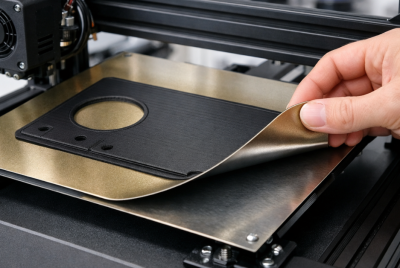
Preparing to Clean
Before diving into the ocean of cleaning resin prints, wouldn’t you grab your snorkel and fins first? Similarly, preparing to clean your 3D resin prints involves gearing up and gathering the right tools to ensure a safe and efficient cleaning process. Before diving into the actual cleaning process, it’s crucial to set up a dedicated cleaning area and gather the necessary tools and safety equipment. Here’s what you need to consider:
Setting Up a Cleaning Station:
- Designate a Cleaning Area: Choose a well-ventilated space, preferably with minimal dust and away from any food preparation areas. Ventilation is important because solvents used in the cleaning process can emit fumes that are harmful if inhaled in enclosed spaces.
- Surface Protection: Use a cover like a plastic sheet or disposable paper to protect the surface where you will be cleaning your prints. This makes cleanup easier and prevents any uncured resin from contaminating your workspace.
Safety Measures: Imagine handling resin like you would a cactus. You’d wear gloves, right? Always wear nitrile gloves to protect your skin from direct contact with the resin, which can be irritating and harmful. Goggles are another essential—think of them as your personal splash guards, keeping your eyes safe from any unexpected splashes. And don’t forget a mask! Resin fumes aren’t something you’d want to breathe in, just as you wouldn’t stand behind a car’s exhaust.
- Personal Protective Equipment (PPE):
- Gloves: Wear nitrile gloves to protect your skin from direct contact with resin and solvents. Resin can be irritating to the skin and potentially hazardous.
- Safety Goggles: Protect your eyes from splashes, as resin can cause severe eye irritation.
- Respirator Mask: If you’re working in a less ventilated area, consider wearing a respirator mask to avoid inhaling fumes from the resin or solvents.
- First Aid Kit: Keep a first aid kit accessible in case of accidental exposure or spills.
Necessary Tools and Materials: Now, what tools would a painter need without his brushes or a chef without his knives? Incomplete, right? For cleaning resin prints, you need a few key tools to make your job easier:
- Containers: Have multiple containers ready for both washing and rinsing. They should be resistant to the solvents used, such as isopropyl alcohol (IPA).
- Soft Brushes: Soft-bristled brushes or toothbrushes can help gently scrub the print surfaces without scratching them.
- Tweezers and Tongs: Use these to handle the prints when they are submerged in solvent, minimizing direct contact.
- Paper Towels or Cloths: Useful for drying the prints after washing and for cleaning up any spills.
- Timer or Stopwatch: Keep track of washing and curing times to ensure consistency and prevent over-processing.
By preparing effectively, you’re setting the stage for a successful clean-up operation. Just like a well-prepped kitchen leads to a smoother cooking experience, a well-prepped cleaning station makes the resin washing process safer, faster, and more effective. Now, with your safety gear on and tools in hand, you’re ready to tackle the cleaning process like a pro!
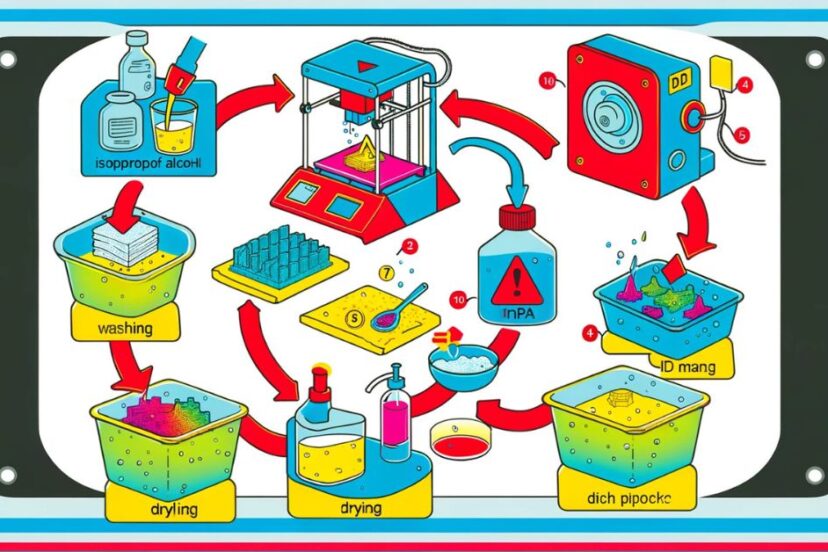
Washing Methods
Have you ever tried to clean a paintbrush just to find it hard as a rock the next day because you didn’t get all the paint out? Similarly, washing 3D resin prints is about removing every trace of uncured resin, ensuring that your final product is as flawless as a freshly polished gemstone. Let’s walk through the two primary methods you might use, each suited to different needs and preferences.
Using Isopropyl Alcohol (IPA):
- Why IPA? Imagine IPA as the soap you’d use to wash off stubborn grease from dishes. It’s the go-to solvent for cleaning resin prints because of its effectiveness at breaking down and washing away uncured resin.
- How to Use It: Think of this as giving your print a bath. You’ll need a container large enough to submerge your print fully. Pour enough IPA into the container, gently place your print inside, and let it soak for about 5 to 10 minutes. You can give it a gentle swish to help loosen the resin — just like swishing around your clothes in a bucket of soapy water.
- Safety Tip: Always remember to wear gloves and work in a well-ventilated area. IPA fumes can be quite strong, just like the sharp smell of nail polish remover.
Alternative Cleaning Solutions:
- Why Look for Alternatives? What if you have sensitive skin and find soap too harsh? Similarly, you might want to use a gentler cleaning solution for your resin prints, especially if you’re sensitive to strong smells or working in less ventilated spaces.
- Options Available: There are specialized resin wash solutions available that are less harsh than IPA and sometimes more environmentally friendly. These are like using a mild detergent instead of a heavy-duty cleaner.
- Detergent and Water: Some water-washable resins can be cleaned using a simple solution of detergent and warm water. This method is less harsh than IPA and is preferable for those seeking environmentally friendly options.
- Commercial Resin Cleaning Agents: These are specially formulated to clean resin prints and are an alternative to IPA. They often provide similar results but can be more expensive.
- Ethyl Alcohol (Ethanol): As an alternative to IPA, ethanol can also be effective, though it is generally less aggressive in dissolving uncured resin.
Mechanical Methods:
- Ultrasonic Cleaners: Using ultrasonic waves, these cleaners can effectively remove resin from even the most intricate designs without manual scrubbing. Fill the cleaner with IPA or an appropriate cleaning fluid, and place the print in it for a short duration. This method is especially useful for high-detail prints.
- Rotary Tools with Soft Brushes: For large prints or those with stubborn resin, a rotary tool equipped with a soft brush attachment can expedite the cleaning process without damaging the surface.
Post-Washing Handling:
- Rinse Thoroughly: After using any cleaning solution, rinse the print with clean, preferably lukewarm water (for water-washable resins) or a fresh batch of solvent to remove any residual cleaner or loose resin.
- Dry Completely: Before moving to the curing stage, ensure the print is completely dry. Any remaining solvent can interfere with the curing process, affecting the final quality of the print.
Regardless of the method you choose, think of cleaning your 3D resin prints as essential maintenance, like brushing your teeth to prevent cavities. Regular and thorough cleaning not only ensures that your prints look their best but also extends their lifespan, keeping them strong and functional for whatever task they’re designed to tackle. So, why not give your prints the care they deserve?
Step-by-Step Guide
Cleaning your 3D resin prints might seem like a daunting task, but imagine it’s like washing off the mud from a diamond in the rough—necessary to reveal the true beauty of your creation. Here’s a clear path you can follow to ensure your prints come out perfectly every time:
Initial Cleaning:
- Suit Up for Safety: Would you go into a storm without an umbrella? Similarly, don’t start cleaning your prints without donning gloves, goggles, and a mask. Safety first!
- Prepare the Bath: Fill a container with enough isopropyl alcohol (IPA) to fully submerge your print. Think of this like preparing a bath for a little pet—only this pet doesn’t like water but prefers IPA!
- First Dip: Place your print in the IPA bath. Let it soak for about 3 to 5 minutes. While it’s soaking, why not gently swish it around like a teabag in a cup, ensuring the IPA reaches all nooks and crannies?
- Scrub Gently: Using a soft brush, carefully scrub the print. Picture yourself brushing dust off an ancient fossil. You want to be thorough yet gentle to preserve all the delicate details.
Secondary Washing:
- Change the Waters: After the initial wash, transfer the print to a fresh IPA bath for a final cleanse. It’s akin to rinsing off soap suds under clean water to make sure nothing unwanted remains.
- Final Swish: Swirl the print in this new bath, just like swirling wine in a glass to release its aroma, ensuring every last bit of resin is loosened.
Drying the Print:
- Pat Dry: Remove the print from the IPA and gently pat it dry with a lint-free cloth. Think of drying off a camera lens—you wouldn’t want any smudges left on it.
- Air Dry: Let the print air dry completely. It’s like letting a cake cool before icing it; rushing can ruin the final finish.
UV Curing:
- Cure Under UV Light: Place the print under a UV lamp. This step is crucial—it’s like baking your clay sculpture in a kiln to turn it from soft clay into solid ceramic.
- Timing is Key: Cure the print for just the right amount of time. Overcuring can make the print brittle, much like leaving cookies in the oven too long.
Inspect Your Work:
- Look for Missed Spots: Check your print as if you’re looking for clues in a detective novel. Any uncured resin spots left?
If so, a quick spot cleaning might be necessary.
By following these steps, you ensure that your 3D resin print is as flawless and sturdy as it was meant to be—transformed from a sticky, resin-covered piece into a pristine and durable object. Isn’t it satisfying to see your work turn out just as you imagined?
Drying and Curing
After you’ve washed the resin off your 3D prints, what’s next? It’s not just about letting them sit and hoping for the best. Drying and curing are like the grand finale of a fireworks show — they really bring out the beauty and functionality of your creation. Let’s dive into how you can master these crucial steps.
Drying:
- Why Hurry? Ever waited for paint to dry? Slow, right? But what if we could speed it up? Using compressed air to dry your prints is akin to using a fan to dry your freshly painted living room walls — it’s quicker and ensures an even dryness across all surfaces. Make sure you get into all the little nooks and crannies, where water loves to hide like a shy cat under a bed.
- Patience is a Virtue: If you’re not in a rush, letting your prints air dry is perfectly fine. It’s like sunbathing — given time, the sun (or air, in this case) does all the work, leaving you with a perfectly dry print. Just make sure they’re in a dust-free environment, because nothing ruins a good sunbathe like a sudden sandstorm!
Curing:
- The Sun’s Embrace: UV light is to resin prints what sunlight is to a blooming flower. It brings out the strength and solidity that the resin is capable of. You can use direct sunlight for this, setting your prints out like cookies on a windowsill. Just remember, like cookies in an oven, too much can be overkill. You wouldn’t want your chocolate chips (or prints) to burn!
- Controlled Curing: Prefer a bit more control? A UV curing station is your go-to. It’s like having an oven with a precise temperature dial, ensuring that every part of your print cures evenly and just right. It’s crucial to follow the recommended exposure time for your specific type of resin — think of it as following a baking recipe to the letter to ensure your cake rises perfectly.
And let’s not forget about safety:
- Ventilation: Both drying and curing can release fumes, especially if heat is used during the drying process. Ensure that your workspace is well-ventilated to maintain a safe environment.
Why Does This Matter? Drying and curing might seem like small steps, but they make a big difference. Just as a baker wouldn’t dream of frosting a cake that’s still hot from the oven, a 3D printing enthusiast knows the importance of properly dried and cured prints. It’s the difference between a model that’s merely ‘done’ and one that’s durable, functional, and ready to display or use.
By handling the drying and curing stages with the same care as the printing and washing, you ensure that your final product isn’t just good — it’s great. So, take the time, apply these techniques, and watch as your prints turn out as perfect as you envisioned.
Post-Processing Tips
After you’ve cleaned, dried, and cured your 3D resin prints, you might think the journey ends there. But isn’t a painter’s canvas just a start before the brush touches paint? Similarly, post-processing is where your 3D print truly begins to transform into a masterpiece. Here are some tips to enhance and perfect your creations:
Sanding:
- Why should your print feel like a sandy beach? Just as a smooth sea stone feels pleasant in hand, sanding your print can eliminate any rough edges and layer lines, making it not only visually appealing but also pleasant to touch. Begin with a coarse grit sandpaper (e.g., 200-400 grit) and work your way to a finer grit (e.g., 600-1000 grit or higher). For an even smoother finish, wet sanding can be employed. This method involves using water to reduce dust and help achieve a very smooth surface, particularly useful for high-detail or aesthetic parts. Remember, patience is key—rushing through sanding is like rushing through a fine meal; you’ll miss all the subtleties.
Painting:
- Ever thought of your print as a blank canvas? Painting your 3D resin print can turn a simple object into a vibrant expression of art. Make sure to apply a primer first—think of it as laying down a smooth undercoat before a painting session. This helps the main layers of paint adhere better and last longer. Whether you choose acrylics or spray paints, each stroke adds character, just like adding spices to a dish enhances its flavor.
Gluing and Assembly:
- Is your model a team of superheroes? Sometimes, parts need to come together to tell a whole story. If your print consists of multiple pieces, consider them as team members that need the right strategy to unite. Use a high-quality adhesive specific for plastics or resins. Test the fit first without glue to ensure everything looks aligned, just as a director rehearses a scene before the actual performance.
Sealing:
- Why wear a raincoat in a storm? To protect against the elements, right? Similarly, sealing your print with a clear coat can protect it from dust, UV rays, and scratches. It’s like giving your print its armor for the battles of everyday display and handling.
Enhancing Details:
- Can a touch of spice make a meal unforgettable? Just so, a bit of dry brushing can highlight the finest details of your print, making features pop and dimensions come to life. Choose a lighter color than the base and gently brush over the raised areas. It’s like catching the light at sunset—suddenly, everything looks a bit more magical.
Incorporating these post-processing steps can significantly elevate the quality and appearance of your 3D resin prints. Think of each step as contributing to a symphony—each note might be subtle, but together they create a harmony that resonates beauty and completeness.
Common Mistakes
When it comes to cleaning 3D resin prints, a few slip-ups can turn your masterpiece into a mess. Let’s walk through some of these pitfalls to ensure your prints come out as intended.
Contaminating the Cleaning Solution:
- Have you ever tried to clean a window with a dirty cloth? Similarly, using a contaminated cleaning solution can leave your prints looking murky. Always start with a fresh batch of solvent for each new cleaning session. It’s like giving your print a bath in clean water rather than a muddy puddle.
Insufficient Cleaning:
- Is brushing your teeth for just five seconds enough? Just like dental hygiene, skimping on the cleaning time for your resin prints won’t get rid of all the grime (uncured resin in this case). Make sure you scrub every nook and cranny, especially in deeply recessed areas. You wouldn’t want your print to wear a “resin plaque,” would you?
Overexposure to UV Light:
- Can too much sun turn a day at the beach into a painful evening? Over-curing a resin print is much the same. Exposing your print to UV light for too long can make it brittle and prone to cracking, just like a sunburnt skin peeling away. Moderation is key — give your print just enough UV light to set it to perfection, not a second more.
Ignoring Safety Procedures:
- Would you handle hot soup without a ladle? Skipping safety gear when dealing with resins and solvents is equally reckless. Always wear gloves, goggles, and sometimes even a mask. This isn’t just about keeping your hands clean; it’s about protecting your health.
Improper Drying:
- Ever rushed out with wet hair in winter? It feels uncomfortable and can catch you a cold. Similarly, if you don’t allow your prints to dry completely before curing, you might trap solvent on them, which can cause imperfections or weaken the structure. Take your time — let it dry fully to ensure the best finish.
Avoiding these common mistakes can greatly enhance the outcome of your 3D resin prints. Think of each print as a culinary creation — you wouldn’t rush a gourmet meal or skip steps in a recipe, so apply the same care and attention to your printing process. With a bit of mindfulness and patience, you’ll see your efforts pay off in the quality and beauty of your final product.
Advanced Techniques
When you’re ready to take your 3D resin print cleaning to the next level, why not explore some advanced techniques that can transform your workflow? Think of these methods as the secret spices that turn a good dish into a gourmet meal—they enhance the end result, making your efforts truly stand out.
Ultrasonic Cleaning:
- Have you ever watched a professional chef use a precision cooker to achieve the perfect texture in a dish? Similarly, an ultrasonic cleaner can be used to achieve unmatched cleanliness in your 3D prints. By using high-frequency sound waves, this device creates a series of small, high-energy bubbles in the cleaning solution, which gently yet effectively remove any uncured resin from even the most intricate designs. Just as a gentle simmer can coax flavors out of a stew, the ultrasonic cleaner works at a microscopic level to ensure your print comes out perfectly clean without any vigorous scrubbing that might damage delicate parts.
Two-Stage Cleaning Process:
- Consider the two-stage cleaning process as double shampooing your hair. In the first wash, you’re loosening up all the dirt and oils, and with the second, you’re ensuring everything unwanted is washed away, leaving your hair—or in this case, your print—pristinely clean. Start with a more abrasive solvent in the first stage to strip away the majority of the resin, then move to a finer, often purer solvent in the second stage to catch any residuals. If you don’t know what to start with, IPA is commonly used, but specialized ultrasonic cleaning solutions are available. This method is especially useful for highly detailed prints where precision is paramount.
Variable Temperature Cleaning:
- Just as a blacksmith tempers steel with precise heating and cooling to enhance its strength, adjusting the temperature of your cleaning solvent can dramatically affect its effectiveness. Warmer temperatures can increase the solvency power, reducing cleaning time and possibly enhancing the removal of stubborn resin. However, just like cooking a delicate sauce, too much heat might spoil the batch—or in this case, deform your print. Monitoring and controlling the temperature during the cleaning process can help optimize results without risking damage to the print.
Enzymatic Cleaners:
- Imagine using a specially formulated soap designed to tackle the toughest stains on your favorite shirt. Enzymatic cleaners work on a similar principle. They are designed to break down the resin at a molecular level, offering a non-toxic and often biodegradable alternative to traditional solvents. These cleaners are particularly valuable when you’re looking to reduce the use of harsh chemicals in your environment or when cleaning prints that will be handled frequently or used in sensitive applications.
Centrifugal Cleaning:
- Rapid Resin Removal: Have you ever seen a salad spinner in action? This relatively new technique involves using a centrifuge to spin the print, forcefully removing excess resin. It’s like giving your print a quick, efficient spin-dry. This method is fast and effective, particularly suitable for batch processing of multiple small items.
Vapor Smoothing:
- Surface Finishing: Think of this as the final polish on a masterpiece. Similar to techniques used in ABS plastic finishing, certain chemicals can be vaporized in a controlled chamber to smooth the surface of resin prints. This method can significantly reduce the appearance of layer lines and give a glossy, smooth finish to the print, much like a professional gloss varnish on a painting.
Laser Cleaning:
- Non-Contact Cleaning: For extremely delicate or intricate prints, laser cleaning systems can be used to remove uncured resin without physical contact. Imagine it as a precision laser surgery for your prints. This method provides precise control over the cleaning process and can preserve the finest details of the print, ensuring that even the most intricate designs remain intact.
By incorporating these advanced techniques into your cleaning process, you’re not just washing away uncured resin; you’re ensuring that every print you produce reflects the highest quality and care, much like an artist ensuring every stroke of the brush is purposeful. Isn’t it worth going the extra mile to see your creations at their best?
Maintenance Tips
Maintaining your 3D resin printer is like caring for a prized garden; regular attention and care ensure it thrives and continues to produce beautiful results. How can you make sure your 3D resin printer remains in top condition and ready for your next project? Here are some straightforward and practical tips to keep your printing process smooth and efficient:
Keep It Clean:
- Why let grime build up when a clean printer means a happy printer? Regularly cleaning your printer’s build plate, vat, and any other surfaces that come into contact with resin ensures that old, partially cured resin doesn’t interfere with your next masterpiece. Think of it as clearing weeds from a garden; it’s all about giving your new prints a clean slate.
Regularly Check and Replace Components:
- Is it time to change the oil in your car? Just as your vehicle needs timely maintenance to run smoothly, your 3D printer’s vat film and resin tank should be checked and replaced as needed to avoid leaks and ensure the highest quality prints. This is akin to replacing worn-out gardening tools that can no longer do the job effectively.
Update Your Software:
- Ever thought about why apps update so often? Keeping your printer’s firmware and software up to date is just like updating your phone—improvements and new features can make all the difference. Software updates often include tweaks and new settings that enhance print quality and machine performance, helping you stay on the cutting edge.
Lubricate Moving Parts:
- Is your door squeaking every time you open it? Like a squeaky door hinge, the moving parts of your printer, such as the Z-axis and any sliders, need regular lubrication to keep them running smoothly and quietly. This small act of maintenance is like oiling your bike chain; it might seem minor, but it significantly impacts performance.
Monitor and Manage Resin Storage:
- Would you leave a cake out in the rain? Properly storing your resin is crucial. Resin should be kept in a cool, dark place to prevent premature curing and degradation. Think of it as storing perishable food in the refrigerator—it extends the shelf life and keeps it fresh until you’re ready to use it.
By following these simple maintenance tips, you’re not just taking care of a machine; you’re ensuring that every print that comes out is as good as your first, preserving the joy and satisfaction of bringing your digital creations to life. Just like a well-maintained garden or a smoothly running car, a well-cared-for printer is a source of pride and joy.
Environmental Tips
When it comes to 3D resin printing, being environmentally conscious isn’t just a choice—it’s a responsibility. How can we enjoy the fruits of innovation without souring the planet that provides them? Here are some simple yet effective ways to minimize your environmental footprint while indulging in 3D printing:
- Mindful Material Use:
- Think Before You Print: Is printing that model absolutely necessary? Imagine each print as a small bucket of paint. Every unnecessary drop you save keeps the overall canvas of our environment a bit cleaner.
- Responsible Resin Handling:
- Reuse and Recycle: Can the resin be reused? While not all resin can be recycled traditionally, finding ways to reuse failed prints or waste resin in other creative projects can be like giving an old book a new cover—it’s the same material, just a new purpose.
- Smart Solvent Management:
- Double Dip: When using solvents like IPA for cleaning, can you extend their life? Using a two-stage cleaning process not only ensures cleaner prints but also stretches the solvent’s usability, like getting every last bit of toothpaste out of the tube.
- Safe Disposal: Are you disposing of your solvents properly? Treating chemicals like IPA as mere water down the drain turns the river of life into a chemical cocktail. Always dispose of solvents according to local regulations, ensuring they don’t contaminate our waterways.
- Energy Efficiency:
- Power Down: Do you leave your printer on when it’s not in use? That’s like leaving the lights on in an empty room. Turning off equipment when not actively printing saves energy—simple actions for a lighter environmental touch.
- Advocate and Educate:
- Spread the Word: Why keep good habits a secret? Share your sustainable practices with the community. It’s like sowing seeds in a garden; the more you sow, the richer the ecosystem.
By integrating these environmental tips into your 3D printing routine, you’re not just crafting beautiful objects—you’re also crafting a better world. Each small step can lead to a leap in our collective environmental consciousness, turning the tide one responsible print at a time.
Conclusion
As we wrap up our journey through the meticulous world of 3D resin printing, let’s take a moment to reflect on the path we’ve traveled. Isn’t it remarkable how a little care and attention can transform a simple pool of resin into a stunning, intricate sculpture? Much like a gardener tending to their plants, the process requires patience, precision, and a gentle touch.
Have you ever watched a magician meticulously prepare their tools before a show? That’s akin to how we must approach the cleaning and curing of our resin prints. Each step, from preparing the workspace to the final curing, is like a carefully rehearsed part of a performance, where every detail counts towards the grand finale.
But why should we bother with all these steps? Because, just like in a recipe, skipping one ingredient can mean the difference between a delightful cake and a baking disaster. Our efforts ensure that each print isn’t just good enough, but a masterpiece of its own right. And isn’t the satisfaction of peeling away the supports to reveal a perfect model similar to finding a pearl inside an oyster?
As we continue to innovate and explore the possibilities of 3D resin printing, let’s remain committed to the practices that preserve both our creations and the world around us. After all, every print not only reflects our creativity and technical skill but also our responsibility to our community and the environment.
So, as you embark on your next printing project, remember the lessons shared here. With the right care, your prints will not only look spectacular but will also stand the test of time, becoming treasures in their own right. Isn’t that what the art and science of 3D printing are all about?
FAQs
- What is the best concentration of IPA for cleaning resin prints?
The most effective concentration of isopropyl alcohol (IPA) for cleaning resin prints is typically around 90% to 99%. This concentration provides a strong solvent capability to effectively dissolve uncured resin without overly diluting the alcohol with water, which can slow down the cleaning process. - Can I reuse IPA for washing multiple prints?
Yes, IPA can be reused for washing multiple prints, but its effectiveness will diminish as it becomes saturated with resin. It’s important to monitor the clarity of the IPA and replace it when you notice it becoming cloudy or less effective at removing resin. To extend the life of IPA, consider using a two-bath method: use the first bath for initial washing to remove most of the resin, then a second, cleaner bath to finish the job. - How long should I cure my resin prints under UV light?
The curing time for resin prints can vary depending on the type of resin used and the intensity of the UV light. Typically, it ranges from 2 to 10 minutes under strong UV light. It’s crucial to refer to the resin manufacturer’s recommendations for specific curing times. Over-curing can lead to brittleness, while under-curing can result in a tacky surface. - What are the signs that my resin print has not been cleaned properly?
Signs of insufficient cleaning include a sticky or greasy surface on the print, visible streaks or smudges of uncured resin, and a dull or cloudy appearance instead of a clear finish (if using clear resin). These issues can affect both the appearance and the structural integrity of the print. - Are there any biodegradable alternatives to IPA for resin cleaning?
While biodegradable alternatives to IPA are less common, there are some eco-friendly cleaning solutions available that are designed to work with certain types of resins. These solutions often use less volatile organic compounds and are designed to be safer for the environment. Always check compatibility with your specific type of resin before switching to a new cleaning solution.